How to Open a Cake Cart: A Recipe for Sweet Success

Opening a cake cart can be a delicious opportunity for aspiring entrepreneurs who have a passion for baking and a desire to bring joy to people’s taste buds. In this article, we will guide you through the essential steps to set up and run your very own cake cart business. From planning and preparation to marketing and customer satisfaction, let’s explore the recipe for sweet success.

Crafting a Delectable Business Plan

Before diving into the world of cake carts, it’s essential to develop a solid business plan. Consider the following key elements:

Define your target market: Identify your ideal customers, such as office workers, students, or event attendees.

Choose a strategic location: Find a busy area with high foot traffic to attract more customers.

Develop a menu: Create a diverse range of cake flavors, sizes, and designs to cater to different preferences.

Calculate costs and pricing: Determine your ingredient and operational costs to set competitive and profitable pricing.

Securing Licenses and Permits

To ensure compliance with local regulations, it’s important to obtain the necessary licenses and permits for operating a food business. Research the requirements in your area and apply for permits related to food handling, health and safety, and business operations.

Sourcing Quality Ingredients

The key to mouthwatering cakes is using high-quality ingredients. Establish relationships with trusted suppliers who can provide fresh and premium ingredients like flour, sugar, butter, eggs, and flavorings. Consistency in ingredient quality will help maintain the excellence of your cakes and build a loyal customer base.

Equipping Your Cake Cart

Invest in a well-equipped cake cart that meets your specific needs. Consider factors like size, mobility, storage capacity, and display capabilities. Ensure your cart is equipped with refrigeration or cooling options to maintain the freshness and quality of your cakes throughout the day.

Designing an Irresistible Display

Make your cake cart visually appealing to entice customers. Display a variety of beautifully decorated cakes that showcase your baking skills. Use attractive signage, colorful decorations, and enticing descriptions to catch the eye of passersby and ignite their sweet cravings.

Spreading the Sweet Word

To attract customers, you need effective marketing strategies. Leverage both online and offline channels to promote your cake cart business. Some marketing ideas include:

Create a professional website or social media pages to showcase your cakes and interact with customers.

Offer special promotions and discounts for first-time customers or group orders.

Collaborate with local businesses or event organizers for cross-promotion opportunities.

Participate in community events or food festivals to introduce your cakes to a wider audience.

Nurturing Customer Relationships

Building strong customer relationships is vital for any business. Provide exceptional customer service by being friendly, attentive, and accommodating. Encourage feedback and reviews to continuously improve your offerings. Consider offering personalized cakes for special occasions to create memorable experiences for your customers.

Adapting and Innovating

The culinary world is ever-evolving, and it’s crucial to stay current with trends and customer preferences. Experiment with new flavors, cake designs, and dietary options like gluten-free or vegan cakes. Continuously seek opportunities for innovation to keep your cake cart business fresh and exciting.

FAQs

What are the essential licenses and permits required to open a cake cart?

To open a cake cart, you will need to obtain several licenses and permits to ensure compliance with local regulations. The specific requirements may vary depending on your location, but common licenses and permits include:

Food Handler’s Permit: This certification ensures that you and your staff have the necessary knowledge and training in food handling and safety.

Health and Safety Permits: These permits ensure that your cake cart meets the hygiene and sanitation standards set by local health departments. They typically involve inspections of your cart’s cleanliness, food storage, and handling practices.

Business License: Obtain a general business license to legally operate your cake cart. This license demonstrates that your business complies with local laws and regulations.

Vendor Permits: Depending on your location, you may need special permits to operate as a vendor in specific areas, such as parks, festivals, or public events.

How can I effectively market my cake cart business?

Marketing plays a crucial role in attracting customers to your cake cart. Here are some effective marketing strategies for your cake cart business:

Online Presence: Create a professional website and social media pages to showcase your cake creations. Share high-quality photos, engage with your audience, and provide updates on promotions or new flavors. Encourage satisfied customers to leave reviews and testimonials.

Local Partnerships: Collaborate with local businesses such as cafes, restaurants, or event organizers to cross-promote each other’s offerings. Consider providing special discounts or exclusive deals for their customers.

Flyers and Business Cards: Distribute flyers and business cards in high-traffic areas, targeting your ideal customer base. Highlight your unique selling points, such as custom designs, special dietary options, or affordable prices.

Community Events: Participate in community events, fairs, or food festivals to introduce your cakes to a wider audience. Set up an eye-catching display, offer samples, and engage with potential customers to build brand awareness.

How can I ensure the quality and freshness of my cakes in a mobile cart setup?

Maintaining the quality and freshness of your cakes is essential for customer satisfaction. Here are some tips to achieve this in a mobile cart setup:

Optimal Storage: Invest in a cake cart that provides adequate refrigeration or cooling options to keep your cakes fresh throughout the day. Maintain proper temperature control to prevent spoilage or melting, especially during warm weather.

Daily Baking Routine: Develop a baking routine that aligns with your sales volume. Bake fresh cakes daily, ensuring a steady supply while minimizing wastage.

Quality Ingredients: Source high-quality ingredients from reputable suppliers. Fresh and premium ingredients will contribute to the taste and overall quality of your cakes. Establish strong relationships with suppliers to ensure consistency in ingredient quality.

Efficient Inventory Management: Regularly assess your inventory to avoid overstocking or running out of popular flavors. Keep track of expiration dates and rotate ingredients accordingly.

Packaging and Display: Use appropriate packaging to preserve the freshness and presentation of your cakes. Ensure that your display is visually appealing, and regularly replenish it to showcase a wide variety of options.

By implementing these practices, you can maintain the quality, taste, and freshness of your cakes, leaving a lasting impression on your customers.

Conclusion

Opening a cake cart requires careful planning, attention to detail, and a passion for baking. By following these essential steps, you can start your journey towards a successful cake cart business. Remember, the key ingredients for success are a delicious menu, exceptional customer service, and a sprinkle of creativity. So, roll up your sleeves, put on your chef’s hat, and get ready to delight customers with your irresistible cake creations.

How to Use Pokémon Arceus in Cake Decorating: A Comprehensive Guide

Pokémon Arceus, the mythical Pokémon from the Sinnoh region, has captured the hearts of fans worldwide. Beyond its role in the Pokémon games, Arceus has become a popular choice for cake decorations, delighting both Pokémon enthusiasts and cake lovers alike. In this article, we will explore how to effectively incorporate Arceus into your cake designs, turning them into edible masterpieces that will leave everyone amazed.

Planning Your Design

Before diving into the cake decorating process, it’s crucial to plan your design meticulously. Consider the size, shape, and theme of your cake, and how Arceus will fit into the overall concept. Decide whether you want Arceus to be the centerpiece or an accent on your cake. Sketch out your ideas and create a vision board to guide you during the decorating process.

Acquiring Arceus Cake Toppers

To bring Arceus to life on your cake, you will need Arceus cake toppers. These toppers are readily available online or at specialty baking stores. Look for toppers that are made of food-safe materials and are specifically designed for cake decoration. You can find Arceus toppers in various poses and sizes, allowing you to choose the one that best suits your design.

Preparing Your Cake

Before decorating, ensure that your cake is baked, cooled, and ready to be decorated. It’s important to create a smooth canvas for your Arceus decoration. Trim any uneven edges and level the cake layers if necessary. Apply a crumb coat of frosting to seal in any loose crumbs, and then refrigerate the cake for about 15-30 minutes to allow the frosting to set.

Applying Frosting

Choose a frosting color that complements the overall theme of your cake. Traditionally, white or light-colored frosting works well with Arceus decorations as it allows the topper to stand out. Using a spatula or piping bag, apply an even layer of frosting to the sides and top of your cake. Smooth out the frosting for a clean finish, ensuring that it is evenly distributed.

Positioning Arceus

Once your cake is frosted, it’s time to position the Arceus cake topper. Gently place the topper on the desired spot, whether it’s on top of the cake or as part of a side design. If needed, you can use a small amount of frosting to secure the topper in place. Take care not to press too hard, as it may damage the topper or the cake’s surface.

Adding Additional Decorations

To enhance the overall appeal of your Arceus-themed cake, consider adding additional decorations. You can use frosting, fondant, or edible glitter to create elements that complement Arceus. For example, you could pipe small stars or clouds around Arceus to simulate a celestial environment. Be creative and use your imagination to make the cake truly unique.

Finishing Touches

To complete your Arceus cake, add any finishing touches that you desire. This may include piping a border around the edges, adding sprinkles, or dusting the cake with edible shimmer. Don’t forget to take a step back and assess the final result, ensuring that it matches your initial design concept.

FAQs

Where can I find Arceus cake toppers for my cake decorating project?

Arceus cake toppers can be found online through various retailers specializing in baking supplies or party decorations. Websites such as Etsy, Amazon, and specialty baking stores often carry a wide range of Pokémon-themed cake toppers, including Arceus. Make sure to check the product details to ensure the topper is made of food-safe materials and suitable for cake decoration.

How should I position the Arceus cake topper on my cake?

The placement of the Arceus cake topper depends on your design vision. If you want Arceus to be the focal point, consider placing it at the center of the cake. Alternatively, you can incorporate Arceus into a side design or create a scene where Arceus interacts with other Pokémon characters. Gently place the topper on the desired spot, and if needed, use a small amount of frosting to secure it. Avoid pressing too hard to prevent damage to the topper or cake surface.

Can I add additional decorations to enhance the Arceus-themed cake?

Absolutely! Adding extra decorations can elevate the overall appeal of your Arceus-themed cake. Consider using frosting, fondant, or edible glitter to create elements that complement Arceus and the Pokémon theme. For example, you can pipe small stars or clouds around Arceus to create a celestial environment. Feel free to unleash your creativity and incorporate other Pokémon characters, Poké Balls, or elements inspired by the Pokémon universe. Remember to ensure that any additional decorations are edible and safe for consumption.

Conclusion

Incorporating Pokémon Arceus into your cake decorating endeavors can elevate your creations to new heights. By carefully planning your design, acquiring the necessary cake toppers, and skillfully positioning Arceus, you can transform a simple cake into a stunning masterpiece. Remember to unleash your creativity and enjoy the process of bringing this beloved Pokémon to life in edible form with these tips.

How Many Eggs in a Cheesecake: The Ultimate Guide

Cheesecake is a classic dessert that has been enjoyed for centuries. While there are countless variations of cheesecake, one of the most common questions asked by home bakers is how many eggs should be used in a cheesecake recipe. In this article, we’ll explore the answer to this question in depth and provide you with some tips for perfecting your cheesecake recipe.

Why Eggs Are Important in Cheesecake?

Eggs play a crucial role in cheesecake because they help bind the ingredients together and provide structure to the finished product. Additionally, eggs add richness and flavor to the cheesecake, making it more decadent and delicious.

How Many Eggs Should You Use in a Cheesecake?

The number of eggs required for a cheesecake recipe varies depending on the recipe itself. A basic cheesecake recipe typically calls for three to four eggs, but some recipes may require more or less. In general, the number of eggs needed depends on the other ingredients in the recipe and the desired texture of the finished product.

For example, a recipe that calls for a lot of cream cheese may require more eggs to help bind everything together. Alternatively, a recipe that uses a lot of sour cream or heavy cream may require fewer eggs because these ingredients already provide richness and structure to the cheesecake.

Tips for Perfecting Your Cheesecake Recipe

Now that you know how many eggs you need for your cheesecake recipe, here are some tips to help you make the perfect cheesecake every time:

Use Room Temperature Ingredients

Room temperature ingredients blend together more easily, resulting in a smoother and creamier cheesecake. Be sure to take your cream cheese and eggs out of the fridge at least an hour before you plan to use them.

Don’t Over mix the Batter

Over mixing can cause the cheesecake to become dense and tough. Be sure to mix your batter just until everything is combined.

Use a Water Bath  

Baking your cheesecake in a water bath helps prevent cracks and ensures a silky smooth texture.

Let Your Cheesecake Cool Gradually

Rapid changes in temperature can cause your cheesecake to crack. To prevent this, let your cheesecake cool in the oven with the door cracked open for about 30 minutes. Then, transfer it to the fridge to cool completely.

FAQs

How many eggs should I use in my cheesecake recipe?

The number of eggs needed in a cheesecake recipe can vary depending on the recipe and desired texture. Generally, a basic recipe will call for three to four eggs, but some recipes may require more or less depending on the other ingredients used. Cream cheese-heavy recipes may require more eggs to help bind everything together, while recipes with a lot of sour cream or heavy cream may need fewer eggs as these ingredients already provide structure and richness.

What role do eggs play in cheesecake?

Eggs play a vital role in cheesecake by binding the ingredients together and providing structure to the finished product. They also add richness and flavor to the cheesecake, making it more decadent and delicious. Without eggs, the cheesecake may not hold together or have the desired texture.

Can I use egg substitutes in my cheesecake recipe?

While it is possible to use egg substitutes in a cheesecake recipe, it may affect the texture and flavor of the finished product. Egg substitutes can vary in their binding and structural properties, which may result in a cheesecake that is too dense or has an unusual texture. It’s best to use real eggs when making a cheesecake for the best results. However, if you need to use an egg substitute due to dietary restrictions or allergies, be sure to do your research and choose a substitute that is appropriate for the recipe.

Conclusion

In conclusion, the number of eggs you need for a cheesecake recipe depends on the other ingredients in the recipe and the desired texture of the finished product. While a basic recipe typically calls for three to four eggs, some recipes may require more or less. With the tips provided in this article, you can perfect your cheesecake recipe and enjoy a delicious and creamy dessert every time.

Transform Your Store-Bought Pesto with These Simple Techniques

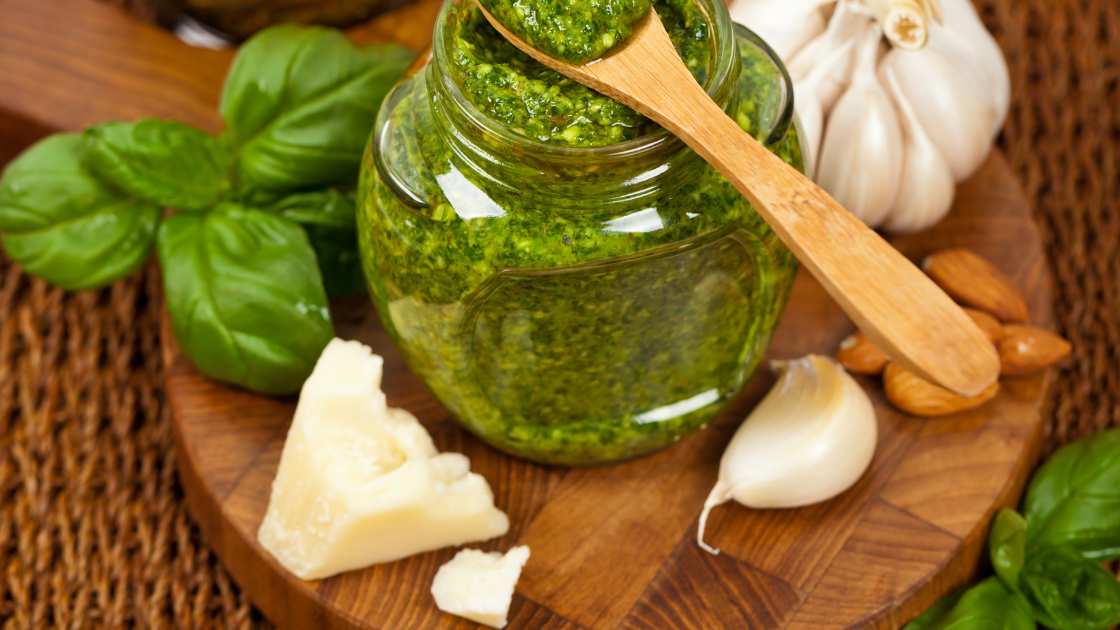
Pesto is a popular Italian sauce that is traditionally made with fresh basil, garlic, pine nuts, olive oil, and Parmesan cheese. While making pesto from scratch can be a labor-intensive process, many people opt for store-bought varieties for convenience. However, store-bought pesto can sometimes lack the rich and creamy texture of homemade pesto. Fortunately, there are a few simple techniques that you can use to transform your store-bought pesto into a luxurious and flavorful sauce.

Transform Your Store-Bought Pesto

Add cream or milk

One of the easiest ways to make store-bought pesto creamier is to add cream or milk. This will not only make the pesto creamier but also mellow out any sharp flavors. Start by adding a tablespoon or two of cream or milk to your pesto and mix well. You can adjust the amount based on your taste preferences.

Incorporate butter

Butter is another ingredient that can help make your pesto creamier. Simply melt a tablespoon or two of unsalted butter and stir it into your pesto. This will give your sauce a rich and velvety texture.

Toast nuts

Toasting nuts before adding them to your pesto can add depth and nuttiness to the sauce. Simply toast the nuts in a dry skillet over medium heat until they are golden brown and fragrant. Let them cool, then chop them finely and add them to your pesto.

Add more cheese

Adding more cheese to your store-bought pesto can help thicken the sauce and give it a richer flavor. Grate some additional Parmesan or Pecorino Romano cheese and stir it into your pesto until it reaches your desired consistency.

Blend with a food processor

If you want to take your pesto to the next level, consider blending it with a food processor or blender. This will help to break down the ingredients and create a smooth and creamy sauce. Simply add your pesto to the food processor or blender, along with any additional ingredients, and blend until smooth.

FAQ’s

How much cream or milk should I add to my store-bought pesto?

It depends on your personal taste preferences and the consistency of your pesto. Start by adding a tablespoon or two of cream or milk and mix well. You can always add more if you want a creamier sauce.

Can I use any type of nuts for my pesto?

Traditionally, pine nuts are used in pesto, but you can use any type of nuts that you like, such as walnuts, almonds, or pistachios. Toasting the nuts before adding them to your pesto will bring out their flavor.

Can I make these changes to any brand of store-bought pesto?

Yes, these techniques can be used with any brand of store-bought pesto. However, keep in mind that the flavors and consistency of different brands may vary, so you may need to adjust the amount of ingredients you add accordingly.

Conclusion

By following these simple techniques, you can easily transform your store-bought pesto into a luxurious and flavorful sauce that will elevate any dish. Whether you’re making pasta, spreading it on bread, or using it as a marinade, these tips will help you achieve a creamy and delicious pesto every time.

Mushroom Cake Arceus: A Delicious Delight

Mushroom cake arceus is a mouth-watering dessert that is loved by many. This delicacy is made from a combination of delicious mushrooms and sweet cake. The result is a dish that is both sweet and savory, and is perfect for any occasion. In this article, we will explore how to use mushroom cake arceus and make it a part of your regular menu.

What is Mushroom Cake Arceus?

Mushroom cake arceus is a unique dessert that combines two different flavors to create a perfect balance. The dish is made from mushrooms, which are sautéed in butter and garlic, and then mixed with a sweet cake batter. The combination of flavors creates a dish that is both sweet and savory.

How to Use Mushroom Cake Arceus?

There are many ways to use mushroom cake arceus in your cooking. Here are a few ideas to get you started:

Serve as a Dessert

Mushroom cake arceus is perfect for serving as a dessert. You can serve it as a standalone dish or pair it with other desserts like ice cream or fresh fruit. The sweetness of the cake pairs perfectly with the savory mushrooms, creating a delicious flavor combination that is sure to impress.

Use as a Topping

You can also use mushroom cake arceus as a topping for other desserts or dishes. For example, you can sprinkle it on top of pancakes or waffles for a unique breakfast dish. You can also use it as a topping for ice cream or yogurt for a delicious treat.

Pair with Wine

Mushroom cake arceus pairs perfectly with a variety of wines. The sweetness of the cake pairs well with a crisp white wine, while the savory mushrooms pair well with a bold red wine. Experiment with different wine pairings to find the perfect match for your taste buds.

Use in Sandwiches

Mushroom cake arceus can also be used as a filling for sandwiches. Spread a layer of mushroom cake arceus on your favorite bread and add some lettuce, tomato, and cheese for a delicious sandwich that is both sweet and savory.

FAQs

How should I store mushroom cake arceus?

Mushroom cake arceus should be stored in an airtight container in the refrigerator. It can last for up to three days in the fridge. To reheat, you can microwave it for a few seconds or place it in a preheated oven at 350°F (180°C) for a few minutes.

Can I use any type of mushrooms for mushroom cake arceus?

Yes, you can use any type of mushrooms for mushroom cake arceus. However, it is recommended to use mushrooms that have a meaty and robust flavor, such as portobello, shiitake, or cremini. These mushrooms will provide a more intense and flavorful taste to the dish.

How can I make mushroom cake arceus gluten-free?

To make mushroom cake arceus gluten-free, you can substitute regular flour with a gluten-free flour mix. You can also use almond flour or coconut flour as a gluten-free alternative. Additionally, make sure that all other ingredients used in the recipe are gluten-free, such as baking powder, butter, and sugar.

Conclusion

Mushroom cake arceus is a delicious dish that is perfect for any occasion. Whether you serve it as a dessert, use it as a topping, pair it with wine, or use it in sandwiches, you are sure to impress your guests with its unique flavor combination. So why not give mushroom cake arceus a try and add it to your regular menu? Your taste buds will thank you!

How to Keep Cake Cool Outside: Tips and Tricks

Cake is a delicious treat that’s perfect for any occasion, but keeping it cool outside can be a challenge. Whether you’re hosting a party or bringing a cake to an event, it’s essential to keep it cool and fresh. Here are some tips and tricks on how to keep cake cool outside.

Choose the Right Container

The first step to keeping your cake cool outside is to choose the right container. You’ll want a container that’s big enough to hold your cake, but not too big that it allows too much air in, which can cause your cake to dry out. You should also look for a container with a tight-fitting lid to keep the cake fresh and prevent any bugs or dirt from getting in.

Use Ice Packs

Ice packs are a great way to keep your cake cool outside. You can place them in a cooler or insulated bag with your cake to keep it at a safe temperature. Make sure to wrap your cake in plastic wrap or parchment paper before putting it in the cooler to prevent any moisture from getting in.

Avoid Direct Sunlight

Direct sunlight can quickly heat up your cake and cause it to melt or become stale. When you’re keeping your cake outside, try to find a shady spot or cover it with a cloth or umbrella to protect it from the sun’s rays. If you’re at an event, ask the host if they have a shady spot where you can place your cake.

Keep It Refrigerated

If possible, it’s always best to keep your cake refrigerated until just before you’re ready to serve it. You can place it in the fridge for a few hours before leaving for your event, then transport it in a cooler with ice packs to keep it cool outside.

Wrap It Up

Wrapping your cake in plastic wrap or parchment paper is a simple way to keep it cool outside. It helps to seal in the moisture and prevent any air from getting in, which can cause your cake to dry out. You can also use aluminum foil to wrap your cake, but make sure to wrap it tightly to prevent any air from getting in.

FAQs

What is the best way to keep a cake cool outside?

The best way to keep a cake cool outside is to use an insulated cooler or bag with ice packs. Wrap your cake in plastic wrap or parchment paper and place it in the cooler with the ice packs. Avoid direct sunlight and keep the container closed to prevent air from getting in and causing the cake to dry out.

Can I keep my cake outside for an extended period?

It’s not recommended to keep your cake outside for an extended period, especially in hot weather. Even with proper cooling methods, the cake can still be at risk of melting or becoming stale. It’s best to keep the cake refrigerated until just before serving or bring it in a cooler with ice packs.

Is it okay to transport a cake that has been in the fridge?

Yes, it’s okay to transport a cake that has been in the fridge. In fact, it’s recommended to refrigerate the cake before transporting it to an event. Wrap it in plastic wrap or parchment paper and place it in a cooler with ice packs to keep it cool during transport. Once you arrive at your destination, remove it from the cooler and let it come to room temperature before serving.

Final Thoughts

Keeping your cake cool outside is essential to ensure that it stays fresh and delicious. By choosing the right container, using ice packs, avoiding direct sunlight, keeping it refrigerated, and wrapping it up, you can enjoy your cake without worrying about it melting or becoming stale. So, the next time you’re bringing a cake to an event or hosting a party, keep these tips in mind to keep your cake cool and fresh.