How to Make a Carrot Cake with Cream Cheese Frosting

Carrot cake with cream cheese frosting is a classic and beloved dessert that combines the earthy sweetness of carrots with the creamy tanginess of cream cheese. This delightful cake is perfect for any occasion, from birthdays to family gatherings. In this article, we will guide you through the step-by-step process of making a delicious carrot cake with a luscious cream cheese frosting.

There are 12 Process of Making Carrot Cake with Cream Cheese Frosting

Ingredients

Before we dive into the baking process, it’s important to gather all the necessary ingredients. Here’s what you’ll need:

  • 2 cups of all-purpose flour
  • 2 cups of granulated sugar
  • 1 cup of vegetable oil
  • 4 large eggs
  • 2 cups of grated carrots (about 4-5 medium-sized carrots)
  • 1 teaspoon of baking powder
  • 1/2 teaspoon of baking soda
  • 1/2 teaspoon of salt
  • 2 teaspoons of ground cinnamon
  • 1/2 teaspoon of ground nutmeg (optional)
  • 1/2 teaspoon of ground ginger (optional)
  • 1/2 cup of chopped walnuts or pecans (optional)
  • 1/2 cup of raisins (optional)
  • For the Cream Cheese Frosting:
  • 8 ounces of cream cheese, softened
  • 1/2 cup (1 stick) of unsalted butter, softened
  • 4 cups of powdered sugar
  • 1 teaspoon of pure vanilla extract

Equipment Needed

To make a carrot cake with cream cheese frosting, you’ll need the following equipment:

  • Two 9-inch round cake pans
  • Parchment paper
  • Mixing bowls
  • Hand mixer or stand mixer
  • Grater
  • Rubber spatula
  • Cooling racks
  • Instructions

Now that you have all your ingredients and equipment ready, let’s get started on making your delicious carrot cake with cream cheese frosting.

Preheat the Oven

Preheat your oven to 350°F (175°C) and grease the two 9-inch round cake pans. Line the bottoms of the pans with parchment paper for easy removal of the cakes later.

Mix Dry Ingredients

In a mixing bowl, whisk together the all-purpose flour, sugar, baking powder, baking soda, salt, ground cinnamon, ground nutmeg, and ground ginger (if using). These dry ingredients form the base of your carrot cake.

Combine Wet Ingredients

In another mixing bowl, beat the eggs and then add the vegetable oil. Mix until well combined. Gradually incorporate the grated carrots into the wet mixture. If you choose to use nuts and raisins, add them now and fold them into the batter.

Combine Wet and Dry Mixtures

Gently fold the dry ingredient mixture into the wet mixture until just combined. Be careful not to overmix; you want a well-blended batter, but overmixing can make the cake tough.

Bake the Carrot Cake

Divide the batter evenly between the prepared cake pans. Smooth the tops with a spatula. Place the pans in the preheated oven and bake for approximately 25-30 minutes or until a toothpick inserted into the center of the cakes comes out clean.

Cool the Cakes

Remove the cakes from the oven and allow them to cool in their pans for about 10 minutes. Then, remove the cakes from the pans and transfer them to a wire rack to cool completely.

Prepare the Cream Cheese Frosting

While the cakes are cooling, prepare the cream cheese frosting. In a mixing bowl, beat together the softened cream cheese and softened butter until smooth and creamy. Gradually add the powdered sugar, one cup at a time, while continuing to beat the mixture. Finally, add the vanilla extract and beat until well combined.

Assemble and Frost the Cake

Once the cakes have completely cooled, place one cake layer on a serving plate or cake stand. Spread a generous layer of cream cheese frosting evenly over the top of the first layer. Place the second cake layer on top and frost the top and sides of the entire cake with the remaining cream cheese frosting.

Decorate (Optional)

For a decorative touch, you can garnish the cake with additional grated carrots, chopped nuts, or a dusting of cinnamon.

Serve and Enjoy

Slice and serve your homemade carrot cake with cream cheese frosting to your delighted family and friends. Enjoy the rich flavors and the perfect balance of sweet and tangy goodness!

FAQs

Can I use pre-shredded carrots for my carrot cake, or is it better to grate them fresh?

While you can use pre-shredded carrots for convenience, it’s generally better to grate fresh carrots for your carrot cake. Freshly grated carrots provide a superior texture and flavor to your cake because they are moister and contain more natural sweetness. Additionally, pre-shredded carrots may have added moisture or preservatives, which can affect the overall consistency of your cake. Grating your own carrots ensures a moist, flavorful, and authentic carrot cake experience.

Can I make cream cheese frosting ahead of time, and how should I store it?

Yes, you can make cream cheese frosting ahead of time. If you need to prepare it in advance, store it in an airtight container in the refrigerator. Cream cheese frosting can be kept in the fridge for up to 5 days. Before using it, allow the frosting to come to room temperature, and then give it a good stir to restore its creamy consistency. If it seems too thick, you can also add a small amount of milk and mix until you achieve the desired texture.

Can I freeze leftover carrot cake with cream cheese frosting?

Yes, you can freeze leftover carrot cake with cream cheese frosting. To do so, ensure that the cake is fully cooled and that it is well-wrapped to prevent freezer burn. You can wrap individual slices or the entire cake in plastic wrap and then aluminum foil. Alternatively, you can use an airtight container. Freeze the cake for up to 2-3 months. When you’re ready to enjoy it again, thaw it in the refrigerator overnight, and bring it to room temperature before serving. The cream cheese frosting may become slightly softer upon thawing, but it should still taste delicious.

Conclusion

Making a carrot cake with cream cheese frosting is a delightful baking project that results in a moist and flavorful dessert loved by many. By following this step-by-step guide and using the specified ingredients, you’ll create a scrumptious carrot cake that’s perfect for any special occasion or simply for satisfying your sweet tooth.

How to Make Whipping Cream

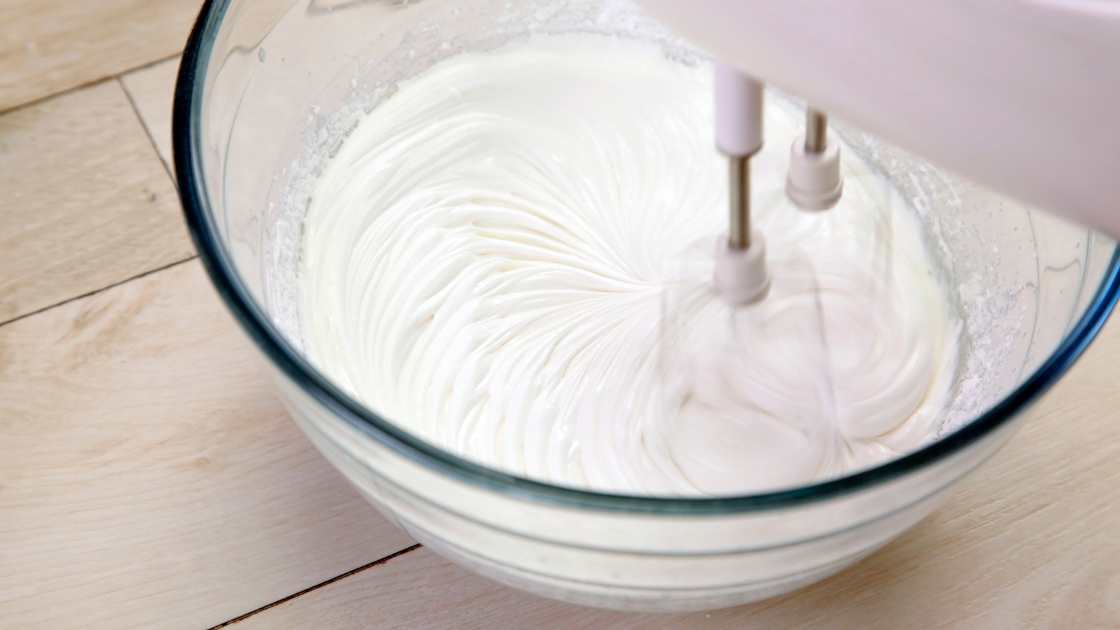
Whipping cream is a versatile ingredient used in a wide range of culinary creations, from topping desserts to enriching sauces and soups. Making your own whipping cream at home is simple and allows you to control the quality and flavor. In this article, we will guide you through the steps to make homemade whipping cream that is rich, creamy, and perfect for any dish.

There are 4 Steps to Make Homemade Whipping Cream

Ingredients

Before you begin, gather the following ingredients:

Heavy Cream:

You will need at least 1 cup of heavy cream for a small batch of whipping cream. Ensure that the cream has a fat content of at least 36%, as this is crucial for achieving the desired consistency.

Sweetener (Optional): 

Depending on your preference, you can add a sweetener like powdered sugar or confectioners’ sugar to sweeten your whipping cream. This step is optional, and you can adjust the sweetness to your liking.

Equipment

To make whipping cream, you will need the following equipment:

A Mixing Bowl: 

Choose a clean, chilled mixing bowl made of metal or glass. A cold bowl helps whip the cream faster.

Whisk or Electric Mixer: 

You can use a hand whisk or an electric mixer with a whisk attachment for quicker and more efficient results.

Make Whipping Cream

Now, let’s dive into the steps to make whipping cream:

Chill Your Equipment

Place your mixing bowl and whisk or mixer attachments in the refrigerator for about 15-30 minutes before you start. This ensures that everything is cold, which is essential for achieving a stable whipped cream.

Pour the Heavy Cream

Pour the desired amount of cold heavy cream into your chilled mixing bowl. If you’re using a sweetener, you can add it at this stage. Start with about 2 tablespoons of powdered sugar for 1 cup of heavy cream and adjust to taste.

Whip the Cream

Using your whisk or electric mixer, begin whipping the cream. Start at low speed and gradually increase it as the cream thickens. Be patient; it may take a few minutes to see significant changes in texture.

Check for Stiff Peaks

Continue whipping until the cream reaches the desired consistency. To check for stiff peaks, lift the whisk or beaters out of the cream; if the cream forms peaks that hold their shape, it’s ready.

Serve or Store

Once your whipping cream is ready, you can use it immediately as a delicious topping for pies, cakes, fruits, or any dessert of your choice. If you have leftovers, store them in an airtight container in the refrigerator for up to 2-3 days.

Tips and Variations

  • You can customize your whipping cream by adding flavorings such as vanilla extract, cocoa powder, or citrus zest for a unique twist.
  • For a dairy-free option, substitute heavy cream with coconut cream or another plant-based alternative.
  • Avoid overwhipping the cream, as it can turn into butter. If you accidentally overwhip it, you can incorporate a little more unwhipped cream to rescue the texture.

FAQs

Can I use regular milk instead of heavy cream to make whipping cream?

No, you cannot substitute regular milk for heavy cream when making whipping cream. The key to whipping cream successfully is its high fat content. Heavy cream contains at least 36% fat, which allows it to trap air and create a stable whipped texture. Regular milk typically has a fat content of around 3-4%, which is insufficient for whipping. Attempting to whip milk will not yield the desired results and may result in a thin, runny consistency.

Can I use a non-dairy milk alternative to make whipping cream for a lactose-free option?

Yes, you can use non-dairy milk alternatives to make lactose-free whipping cream. Coconut cream and almond milk are popular choices for creating dairy-free whipping cream. Be sure to select a non-dairy milk that has a high fat content to mimic the richness of heavy cream. Coconut cream, in particular, is a suitable option due to its natural creaminess. Follow the same process as with heavy cream, and you can enjoy a dairy-free whipping cream that works well as a topping or ingredient in various recipes.

What can I do if my whipped cream turns grainy or curdled?

If your whipped cream turns grainy or curdled, it has likely been overwhipped. To salvage it, follow these steps:

Stop whipping immediately: 

Turn off the mixer or put down the whisk as soon as you notice the grainy texture.

Add more unwhipped cream: 

Gently fold in a small amount of unwhipped heavy cream into the overwhipped cream. This should help to smooth out the texture.

Mix briefly: 

Use your mixer or whisk to briefly mix the cream again, but be cautious not to overwhip it further. You want to combine the unwhipped cream with the overwhipped cream to achieve a smoother consistency.

Taste and adjust: 

Taste the whipped cream and adjust the sweetness if necessary by adding more sugar or flavorings.

Conclusion

Making homemade whipping cream is a straightforward process that elevates the taste of your desserts and culinary creations. With just a few simple steps and the right ingredients, you can enjoy creamy, dreamy whipped cream that’s perfect for any occasion. Whether you choose to sweeten it or customize the flavor, homemade whipping cream adds a delightful touch to your favorite dishes.

How to Melt Sugar: Sweet Secrets Unveiled

Melted sugar, often referred to as caramel, is the magical ingredient that adds a delightful sweetness and a touch of sophistication to countless culinary creations. Whether you’re crafting a decadent dessert, making a glossy sauce, or creating a beautiful sugar decoration, knowing how to melt sugar properly is a fundamental skill for any aspiring home chef. In this guide, we’ll take you through the steps of melting sugar with precision and flair, unlocking the secrets to creating the perfect caramel.

There are 7 Steps of Melting Sugar

Gather Your Tools and Ingredients

Before diving into the sugar-melting process, it’s crucial to have all your tools and ingredients ready. Here’s what you’ll need:

  • Granulated sugar
  • A heavy-bottomed saucepan
  • Water
  • A wooden spoon or heat-resistant spatula
  • A candy thermometer (optional)
  • Cold water in a bowl (for emergencies)
  • Oven mitts or kitchen gloves

Select the Right Pan

Choosing the appropriate saucepan is paramount to the success of your sugar-melting endeavor. Opt for a heavy-bottomed pan, such as a stainless steel or copper one. The heavy bottom distributes heat evenly, preventing hot spots that can cause sugar to burn or crystallize prematurely.

Measure Your Sugar and Add Water

Start by measuring the desired amount of granulated sugar you need for your recipe. Place it into the clean, dry saucepan. To aid the melting process and prevent premature crystallization, add a small amount of water. Typically, you’ll want to use about one-quarter cup of water per cup of sugar.

Heat Gradually

Place the saucepan over medium heat. Allow the sugar to gradually dissolve into the water. Do not stir at this stage, as it can cause the sugar to crystallize. Instead, swirl the pan gently to ensure even heating. A candy thermometer can be helpful here, but it’s not mandatory.

Observe the Color Change

As the sugar syrup heats, it will start to change color from clear to pale yellow, then to amber. The transformation can be quite rapid, so keep a close eye on it. Once it reaches your desired caramelization level (light, medium, or dark caramel), remove it from the heat immediately to prevent overcooking.

Cooling and Using Caramel

Once you’ve achieved the perfect caramel color, carefully place the saucepan on a heat-resistant surface. Be cautious as the caramel is extremely hot.

If you’re using the caramel for a sauce, you can add cream or butter at this stage to create a luscious caramel sauce. Remember to do this gradually and whisk constantly.

If you’re making caramel decorations or spun sugar, allow the caramel to cool slightly until it thickens but remains pourable. Then, use a fork or whisk to create beautiful designs or drizzle it over your desserts.

Safety Precautions

Molten sugar can cause severe burns, so always exercise caution when working with it. If you accidentally spill hot caramel on your skin, immediately immerse the affected area in cold water to minimize damage. Keep children and pets away from the cooking area during this process.

FAQs

Can I melt sugar without water?

Yes, you can melt sugar without water, but it requires a different technique. Dry caramelization involves melting sugar directly in a clean, dry saucepan over low to medium heat. Stir the sugar constantly with a wooden spoon or heat-resistant spatula as it begins to melt. Be vigilant, as dry caramelization can quickly go from amber to burnt. Once you achieve the desired caramel color, remove it from the heat immediately and proceed with your recipe.

Why does my melted sugar sometimes crystallize or become grainy?

Crystallization can occur if even a small crystal of sugar is introduced into the syrup during the melting process. To prevent crystallization, make sure your saucepan and utensils are clean and dry before you start. Avoid stirring the sugar until it has fully dissolved, and use a wet pastry brush to wash down any sugar crystals that may have adhered to the sides of the saucepan. Additionally, adding a small amount of acid, like cream of tartar or lemon juice, to the sugar-water mixture can help inhibit crystallization.

Can I reuse burnt caramel or sugar?

Unfortunately, once sugar or caramel has burned, it cannot be salvaged for most culinary purposes. Burnt sugar takes on a bitter taste that can negatively affect the flavor of your dish. However, you can learn from the experience and try again with fresh sugar to achieve the desired caramelization. To avoid burning in the future, maintain a close watch over the sugar as it melts and remove it from the heat as soon as it reaches the desired color.

Conclusion

Learning how to melt sugar is a skill that opens the door to a world of delicious possibilities in the kitchen. With the right tools, patience, and a little practice, you can master the art of caramelization. Whether you’re creating a stunning dessert centerpiece or crafting a delectable sauce, the secrets to melting sugar have been unveiled. So, get ready to add a touch of sweetness and sophistication to your culinary creations!

Unveiling the GoldenSaffron Saffron Price Calculator

Saffron, often known as the “red gold,” boasts a rich legacy in history and culinary arts. Extracted from the delicate stigmas of Crocus sativus flowers, this exotic spice bestows unique flavors, vibrant hues, and captivating aromas to diverse dishes. Yet, the saffron market’s capricious pricing dance is orchestrated by an intricate interplay of factors including cultivation intricacies, global demand, geopolitical shifts, and climate variations. Presently valued at approximately $8 per gram, delving into the contributing facets reveals the captivating complexity of the industry.