How to Make a Cheesecake with Cream Cheese

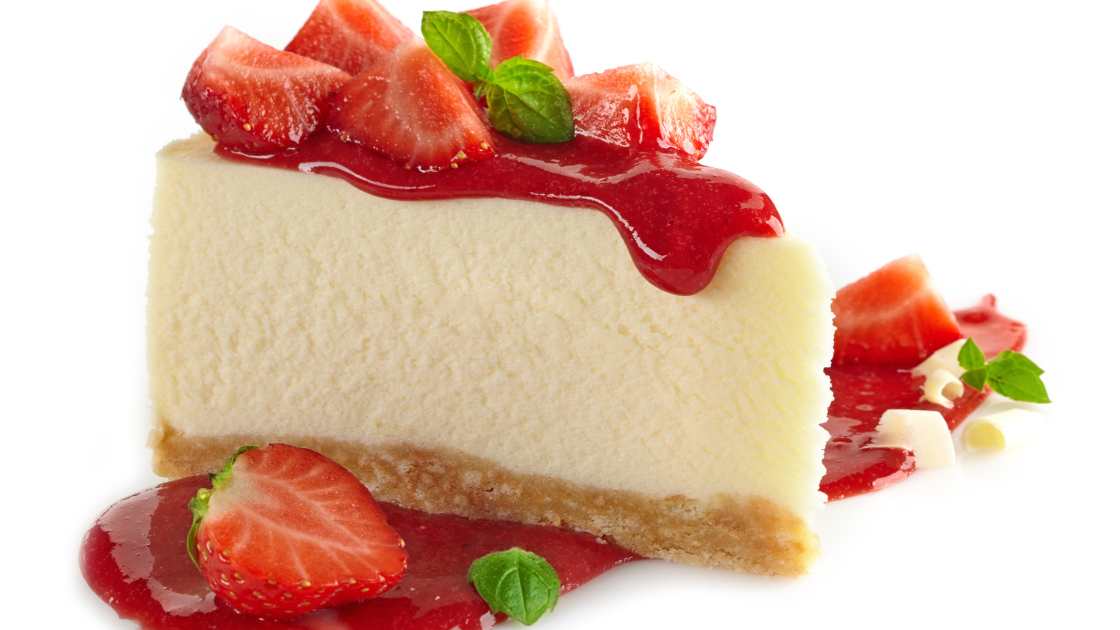
Cheesecake is a beloved dessert known for its rich and creamy texture. Cream cheese is the key ingredient that gives cheesecake its decadent flavor. In this article, we’ll guide you through the steps on how to make a delicious cheesecake with cream cheese, from preparing the crust to the final garnishes.

There are 9 Effective Steps to Make a Cheesecake with Cream Cheese

Ingredients

Before you start, make sure you have all the necessary ingredients for your cheesecake.

For the Crust:

  • 1 1/2 cups of graham cracker crumbs
  • 1/4 cup of granulated sugar
  • 1/2 cup of unsalted butter, melted
  • For the Filling:
  • 4 packages (32 oz) of cream cheese, softened
  • 1 1/4 cups of granulated sugar
  • 1 tsp of vanilla extract
  • 4 large eggs
  • 1 cup of sour cream
  • 1/4 cup of all-purpose flour

Equipment

To make a cheesecake with cream cheese, you’ll need the following equipment:

  • 9-inch springform pan
  • Mixing bowls
  • Electric mixer
  • Rubber spatula
  • Aluminum foil
  • Baking sheet
  • Food processor (optional for crushing graham crackers)

Preheat the Oven

Preheat your oven to 325°F (163°C) and position the rack in the middle of the oven.

Prepare the Crust

  • In a mixing bowl, combine the graham cracker crumbs, sugar, and melted butter. Mix until the crumbs are evenly coated.
  • Press the mixture into the bottom of the 9-inch springform pan to form an even crust.
  • Place the pan in the refrigerator while you prepare the filling.

Make the Cheesecake Filling

  • In a large mixing bowl, beat the softened cream cheese until it’s smooth and creamy.
  • Gradually add the sugar and vanilla extract while continuing to beat the mixture.
  • Add the eggs one at a time, mixing well after each addition.
  • Mix in the sour cream and flour until the batter is smooth and creamy.

Assemble and Bake

  • Remove the crust from the refrigerator and wrap the bottom of the springform pan with aluminum foil to prevent any water from leaking into the pan during the baking process.
  • Pour the cheesecake filling over the crust in the pan.
  • Place the springform pan on a baking sheet and put it in the preheated oven.

Water Bath (Optional)

For extra creamy and crack-free cheesecake, you can use a water bath. Place a larger pan filled with hot water on the lower oven rack while the cheesecake is on the upper rack.

Bake and Cool

  • Bake the cheesecake for about 45-50 minutes, or until the edges are set and the center is slightly jiggly.
  • Turn off the oven, crack the oven door, and let the cheesecake cool inside for about an hour.
  • Remove the cheesecake from the oven and let it cool completely at room temperature.

Refrigerate

Once the cheesecake has cooled to room temperature, refrigerate it for at least 4 hours, but overnight is best for optimal flavor and texture.

Garnish and Serve

  • Before serving, you can garnish your cheesecake with fresh fruit, whipped cream, chocolate shavings, or any other toppings of your choice.
  • Run a knife around the edges of the cheesecake to loosen it from the pan before removing the springform ring.

FAQs

Can I use any type of cream cheese for making cheesecake?

It’s highly recommended to use full-fat, brick-style cream cheese for making cheesecake. The most popular brand for cheesecake is Philadelphia cream cheese, but any good-quality cream cheese will work. Avoid using low-fat or spreadable cream cheese, as they contain more moisture and can negatively impact the texture and consistency of your cheesecake. Stick to brick-style, full-fat cream cheese for the best results.

Can I substitute graham crackers for the crust in a cheesecake recipe?

Yes, you can substitute graham crackers for the crust in a cheesecake recipe. Graham crackers are a popular choice, but you can also use other cookies like digestive biscuits or even chocolate cookies, depending on your preference. To make the crust, crush the cookies and mix them with melted butter and a bit of sugar. The basic ratio is about 1 1/2 cups of cookie crumbs, 1/4 cup of sugar, and 1/2 cup of melted butter for a 9-inch cheesecake. Press this mixture into the bottom of your springform pan, and you’re good to go!

How do I prevent cracks in my cheesecake when baking?

Cracks in cheesecakes can be prevented by taking a few precautions:

Avoid overmixing: 

Overmixing the cheesecake batter can incorporate too much air, leading to cracks. Mix only until the ingredients are combined.

Use a water bath: 

Baking your cheesecake in a water bath can help regulate the temperature and prevent cracking. Wrap the springform pan in aluminum foil to prevent water from seeping in.

Don’t overbake: 

Overbaking can cause the cheesecake to crack. The edges should be set, and the center should still have a slight jiggle when you remove it from the oven. It will continue to set as it cools.

Cool gradually: 

After baking, cool the cheesecake gradually. Turn off the oven, crack the door, and allow it to cool inside the oven for an hour before moving it to room temperature. Then refrigerate it for several hours or overnight before serving. Gradual cooling prevents sudden temperature changes that can lead to cracks.

Conclusion

Making a cheesecake with cream cheese is a delightful culinary experience. By following these step-by-step instructions, you can create a creamy, delectable cheesecake that will impress your family and friends. Enjoy your homemade cheesecake!

How to Give Your Bar Stool a Stylish Makeover with Fabric

Are you someone who loves to indulge in DIY projects? If so, then you must have come across a few old and worn-out bar stools that are in desperate need of a makeover. If you’re looking for a creative and affordable solution to transform your space, then you’re in luck! In this step-by-step guide, we’ll show you how to cover a bar stool with fabric and give it a stylish and fresh look.

How to Make a Cassata Cake

Cassata cake is a delightful and traditional Italian dessert that combines rich layers of sponge cake, sweet ricotta cheese filling, candied fruit, and chocolate. This delectable treat is perfect for special occasions and celebrations. In this article, we’ll take you through the step-by-step process of making a delicious cassata cake that will impress your friends and family.

There are 7 Effective Process of Making a Cassata Cake

Ingredients

Before you embark on making a cassata cake, gather all the necessary ingredients to ensure a smooth baking process. You’ll need:

For the Sponge Cake Layers:

  • 2 cups of all-purpose flour
  • 2 teaspoons of baking powder
  • 1/2 teaspoon of salt
  • 1 cup of granulated sugar
  • 4 large eggs
  • 1/2 cup of unsalted butter, melted
  • 1/2 cup of whole milk
  • 1 teaspoon of vanilla extract

For the Ricotta Filling:

  • 2 cups of whole milk ricotta cheese
  • 1/2 cup of confectioners’ sugar
  • 1 teaspoon of vanilla extract
  • 1/4 cup of finely chopped candied fruit (citron, cherries, and orange peel)
  • 1/4 cup of mini chocolate chips

For the Syrup:

  • 1/4 cup of water
  • 1/4 cup of granulated sugar
  • 1/4 cup of rum or marsala wine (optional)

For the Icing:

  • 1 cup of confectioners’ sugar
  • 2-3 tablespoons of milk
  • 1/2 teaspoon of almond extract

For Decoration:

  • Candied fruit and chopped pistachios (optional)

Prepare the Sponge Cake

  • Preheat your oven to 350°F (175°C) and grease two 9-inch round cake pans.
  • In a bowl, sift together the flour, baking powder, and salt.
  • In another bowl, beat the eggs and sugar together until light and fluffy. Add melted butter, milk, and vanilla extract.
  • Gradually fold the dry ingredients into the wet ingredients until well combined.
  • Divide the batter evenly between the prepared pans and bake for 25-30 minutes or until a toothpick comes out clean.
  • Allow the cakes to cool in the pans for a few minutes before transferring them to a wire rack to cool completely.

Prepare the Ricotta Filling

  • In a mixing bowl, combine the ricotta cheese, confectioners’ sugar, vanilla extract, candied fruit, and mini chocolate chips. Mix until well combined.
  • Refrigerate the filling until you are ready to assemble the cake.

Prepare the Syrup

  • In a small saucepan, combine the water and granulated sugar.
  • Bring the mixture to a boil and simmer for a few minutes until the sugar is dissolved.
  • Remove from heat and let it cool. You can add rum or marsala wine to the syrup if desired.

Assemble the Cassata Cake

  • Place one sponge cake layer on a serving plate. Drizzle it with the syrup.
  • Spread a layer of the ricotta filling evenly over the cake.
  • Top with the second cake layer and drizzle with more syrup.
  • Spread the remaining ricotta filling over the second cake layer.

Make the Icing

  • In a small bowl, whisk together the confectioners’ sugar, milk, and almond extract until smooth.
  • Pour the icing over the top of the cake, allowing it to drip down the sides.

Decorate the Cake

  • Garnish the cassata cake with candied fruit and chopped pistachios, if desired.
  • Refrigerate the cake for at least 4 hours or overnight to allow the flavors to meld and the cake to set.

FAQs

Can I use store-bought sponge cake for making a cassata cake?

Yes, you can use store-bought sponge cake if you’re short on time or prefer a more convenient option. However, making the sponge cake from scratch allows you to customize the flavor and texture of the cake layers. If you choose to use store-bought cake, ensure it’s of good quality, and make sure it complements the other elements of your cassata cake.

Can I omit the alcohol in the syrup when making cassata cake?

Absolutely, you can omit the alcohol in the syrup for your cassata cake. The rum or marsala wine is an optional ingredient and can be left out if you prefer a non-alcoholic version. The syrup primarily serves to keep the cake moist and add a touch of flavor. You can replace the alcohol with additional water or fruit juice for a suitable non-alcoholic alternative.

How far in advance can I prepare a cassata cake for an event?

Cassata cake is best when allowed to chill and set for several hours or even overnight. You can prepare the cake a day in advance and store it in the refrigerator, covered to prevent it from drying out. This resting period allows the flavors to meld and the cake to become more cohesive, resulting in a more delicious and satisfying dessert. However, for optimal freshness, it’s best to consume the cassata cake within 2-3 days of preparation

Conclusion

Cassata cake is a classic Italian dessert that’s sure to impress your guests. By following these steps and paying attention to the details, you can create a delicious and beautiful cassata cake for your next special occasion. Enjoy this delightful treat that combines the flavors of Italy in every bite!

How to Make a Tractor Diaper Cake

Diaper cakes have become a popular and creative gift for baby showers. They not only make for a visually appealing centerpiece but are also incredibly practical as they are loaded with diapers, a must-have for any new parent. One of the most charming and unique variations of a diaper cake is the tractor diaper cake. In this step-by-step guide, we will show you how to make a tractor diaper cake that will surely impress at your next baby shower.

There are 9 Effective Steps to Make a Tractor Diaper Cake

Materials Needed

Before we dive into the tutorial, make sure you have all the necessary materials at hand. Here’s what you’ll need:

  • Diapers (around 50-60, depending on the size of your tractor)
  • Cardboard or foam board
  • Ribbon
  • Rubber bands
  • Glue gun and glue sticks
  • Scissors
  • Wooden dowels
  • Baby blankets, receiving blankets, or fabric for the tractor cover
  • Decorative items such as baby toys, pacifiers, and baby socks

Prepare the Base

Cut the cardboard or foam board into a rectangular shape to serve as the base for your tractor diaper cake. Ensure it’s large enough to hold the entire tractor structure.

Create the Wheels

  • Take 4-6 diapers, depending on the desired wheel size, and roll them up tightly.
  • Secure the rolled diapers with a rubber band.
  • Repeat this process to create all the wheels you’ll need for the tractor.

Build the Tractor Frame

  • Take a few rolled diapers and arrange them in a rectangular shape on the cardboard base, creating the tractor’s frame. These diapers will serve as the tractor’s body.
  • Use rubber bands to secure the diapers together.
  • To make the tractor more stable, insert wooden dowels into the center of the frame, making sure they are securely attached to the base.

Add the Wheels

  • Attach the diaper wheels to the tractor frame using rubber bands.
  • Position the wheels at the four corners of the tractor frame to give it that authentic tractor look.

Create the Tractor Cover

  • Take a baby blanket, receiving blanket, or a piece of fabric that is large enough to cover the tractor frame.
  • Drape the fabric over the frame and secure it with a ribbon, giving your tractor its unique cover.

Decorate the Tractor

  • Use your creativity to decorate the tractor. You can add baby toys, pacifiers, and baby socks by attaching them with a glue gun.
  • You can also tie ribbons or bows around the tractor for an extra touch of charm.

Add the Finishing Touches

  • Take smaller rolled diapers and arrange them on the tractor to create the exhaust pipe and other small details.
  • Use the glue gun to secure these smaller diaper rolls in place.

Finishing and Presentation

  • Make sure everything is securely attached and that the diaper cake looks neat and presentable.
  • Place the tractor diaper cake on a decorative tray or wrap it in clear cellophane for a polished finish.
  • Your tractor diaper cake is now ready to be presented as a unique and thoughtful baby shower gift.

FAQs

How many diapers do I need to make a tractor diaper cake?

The number of diapers you’ll need to make a tractor diaper cake depends on the size of the tractor you want to create. On average, you will require around 50-60 diapers to complete a standard-sized tractor. If you’re making a larger or more intricate tractor, you may need more diapers. It’s a good idea to have a few extra diapers on hand in case you need them.

Can I use different types of blankets or fabric for the tractor cover?

Yes, you can use various types of blankets or fabric to cover your tractor diaper cake. Baby blankets, receiving blankets, or any baby-themed fabric will work well. Choose a fabric that complements the baby shower theme or the color scheme you prefer. Just ensure that the fabric is large enough to cover the tractor frame and can be easily secured with a ribbon or another fastening method.

Are there any safety concerns when making a tractor diaper cake with wooden dowels?

When using wooden dowels to stabilize your tractor diaper cake, safety is a crucial consideration. Here are some safety tips:

  • Make sure the wooden dowels are securely inserted into the tractor frame and the base to prevent them from slipping or causing accidents.
  • Trim the wooden dowels to an appropriate length to avoid sharp or protruding ends that could potentially harm someone.
  • Keep the finished tractor diaper cake out of reach of children, as small parts or decorative items, such as baby toys and pacifiers, may pose choking hazards.

Conclusion

Creating a tractor diaper cake is a fun and creative way to gift diapers and other baby essentials. By following these step-by-step instructions, you can craft a charming and practical centerpiece that will surely impress at the baby shower. Your thoughtful and unique gift is sure to be appreciated by any expecting parent.